Taste, Creativity & Design.. that's what I love about food!

Friday

Peach and Blueberry Pavlovas with a Blueberry Wine Zabaione


This is a dessert within a dessert within a dessert! Deconstructed, you have some of the most enjoyable sweets to eat..  fresh fruit, pavlova (meringue) and a rich custardy Zabaione!

Growing up in our household, my mom used the "idea" of a Zabaione, for a quick morning juice specialty. In a blender, she would whip a few egg yolks with a sprinkle of sugar and then drizzle in the orange juice.. I still remember it today as being one of my favorite morning drinks!

Together, all of these individual desserts make a gourmet delight to satisfy any dessert table!


Grilled Peach and Blueberry Pavlovas with a Blueberry Wine Zabaione
recipe by Laurie M. Vengoechea, DMC

Dessert Elements
7-8 Individual Pavlova's
Blueberry Wine Zabaione
Grilled Peaches
1 Pint Fresh Blueberries
Whipped Cream 

Pavlovas 
Preheat oven to 250
Place rack in center of oven.  
Line a baking sheet with parchment paper and draw a 3-4 inch circles on the paper. Turn the parchment paper over so the circle is on the reverse side.

Ingredients
4 large egg whites
1 cup superfine or castor sugar
1/2 teaspoon pure vanilla extract
1 teaspoon white vinegar
1/2 tablespoon cornstarch 

Directions
1. In the bowl of your electric mixer, with the whisk attachment, beat the egg whites on medium speed until they hold soft peaks.
2. Start adding the sugar, a tablespoon at a time, and continue to beat, on high speed, until the meringue holds very stiff and shiny peaks. (Test to see if the sugar is fully dissolved by rubbing a little of the meringue between your thumb and index finger.  The meringue should feel smooth, not gritty. If it feels gritty the sugar has not fully dissolved so keep beating until it feels smooth between your fingers). 
3. Beat in the vanilla extract. 
4. Sprinkle the vinegar and cornstarch over the top of the meringue and, with a rubber spatula, gently fold in. 
5. Spread the meringue inside the circles drawn on the parchment paper, smoothing the edges.
6. Bake for 60 to 75 minutes or until the outside is dry and a very pale cream color. Turn the oven off, leave the door slightly ajar, and let the meringue cool completely in the oven. (The outside of the meringue will feel firm to the touch, if gently pressed, but as it cools you will get a little cracking and you will see that the inside is soft and marshmallowy.) 

The cooled meringue can be made and stored in a cool dry place, in an airtight container, for a few days. 

Makes 7-8 individual Pavlovas

Blueberry Wine Zabaione
Ingredients
4 egg yolks
4 Tbs. granulated sugar
4 tablespoons Blueberry Wine
1/2 tsp. Lemon Zest

Directions
1. Boil some water in a saucepan.
2. Separate the yolks from the whites and place the yolks in a heatproof bowl.  (Save the whites for a meringue dish)
3. Add the sugar and whisk (or mix with an electric hand mixer) until the mixture turns light yellow.
Place the bowl with the egg mixture on top of the pan with
boiling water. Continue whisking. Do not allow the bowl to touch the water, it will cause your zabaione to get lumpy.
4. In a thin stream, SLOWLY add the wine to the egg mixture as you keep whisking.
5. Keep beating the egg mixture until it has doubled in volume and is fluffy and light...about 10-15 minutes.
6. Take off heat. Stir in the lemon zest. Place a piece of plastic over it and keep in the refrigerator

Grilled Peaches
2-3 Large, firm but ripe peaches
1 tsp. mild olive oil
2 tsp. Turbinado Sugar or Raw Sugar
Grill Pan

Directions
Cut peaches in half and remove the pit.
Heat grill pan on medium heat.
Brush a small amount of the olive oil on peach halves so they don't stick to the grill pan.
Sprinkle a small amount of sugar over the peach as well. This will give a beautiful caramelized effect to the grilled peaches.
Place peaches on pre-heated pan pressing down for 5 seconds. Remove pressure from peach and allow to cook for around 1 minutes. When peach has nicely grilled with caramelization turn over and cook for an additional minute.
Remove to platter.
When cool slice peaches for the Pavlovas.

Putting it all together
Drizzle a few tablespoons of Zabaione on individual dishes.
Place a Pavlova on the Zabaione, fill with Grilled Peaches and fresh Blueberries.


Top with a dollop of whipped cream


Read More

Wednesday

Shepherd's Cottage Pie


This amazingly tasty dish has been making an appearance throughout Europe for hundreds of years. Mutton, lamb, beef and even fish, can easily find it's way into this British pie. I was first introduced to an English Shepherds pie early in my college days while on a short one month missions trip abroad. Previously in my home, we made this with a pastry crust, but recently an English girlfriend of mine told me that they make theirs without a crust all together! So easy to prepare and still just as satisfying! 

This recipe is pretty much allergy friendly and has ingredients that can easily be adapted to fit your dietary needs. Hope you enjoy!!

Ingredients
6 cups Mashed Potatoes (recipe follows)
2 cups Brown Sauce (recipe follows)
2 lbs. Ground Lamb or Beef
½ Onion
Salt and pepper
Butter or margarine
3 cups Dubliner Cheese Grated, I use Kerrygold Dubliner Cheese (*Please see note at the bottom)
3 Carrots cleaned and cut into small squares and cooked till tender.
1 Cup Peas (frozen not canned) cooked
6 Crimini Mushrooms cleaned and sliced

Mashed Potatoes
2-3 pounds russet potatos
3 tablespoons unsalted butter or margarine
3/4 to 1 cup raw milk or *Rice milk 
Salt and white pepper to taste

Peel potatoes and cut into 2-inch pieces. In a large heavy saucepan simmer potatoes in salted water to cover by 1 inch 10 minutes, or until tender, and drain in a colander. In pan or bowl combine potatoes, butter or margarine, and 3/4-cup milk. With a potato masher or blender mash potatoes until just smooth, adding more milk and butter if necessary to make a creamy but not pasty potato. *Over cooking and blending your potatoes will make them too starchy. Season with salt and pepper and set aside.

Brown Sauce
3 shallots or scallions, finely chopped
3 tablespoons butter or margarine
10-½ -ounces beef broth, canned is fine
1 Tb. Lea & Perrins Worcestershire sauce (this is gluten free)
1 Tsp. Fresh Tarragon leaves finely chopped
½ Tsp. thyme
Salt, pepper


Sauté chopped shallots or scallions in butter. Gradually add wortsheshire and beef broth. Let it come to a boil and add the seasonings. Cook down for a few minutes. Let simmer for a few minutes and strain. Set aside.

Ground Lamb or Beef
Finely chop ½ an onion. Sauté in 2 Tbsp. butter. Add ground meat and cook. Drain liquids. Season with salt and pepper and set aside.

Vegetables
Mix prepared vegetables together.


Preparations
In a lasagna or sheet cake pan, start with mashed potatoes layer your ingredients, always adding cheese and sauce after each layer. Repeat process until you end with mashed potatoes on top. Potatoes can be piped on for a decorative finish but it is not necessary. Bake Shepherds Pie in a pre-heated 375° oven for 20 minutes. If potatoes start to brown too quickly loosely cover with foil.

This recipe can also be found on my allergy friendly blog,  A Favored Life.  

*Cheese can be omitted for those with a dairy intolerance, or substitute your favorite dairy free cheese.


** Any milk ingredient in this recipe can be substituted with rice, coconut or almond milk to fit your dietary need.


Read More

Tuesday

Chunky Applesauce


Apple season just ended and we had a wonderful crop from our tree this year! Cinnamon and spice and everything nice has permeated throughout the house with apple fare filling the cupboards and dessert trays. Now, thoughts of holiday foods and family gatherings coming up in just in a few weeks!


This is a simple crock pot applesauce recipe that makes such a yummy, low sugar, chunky monkey type of sauce! Every slow cooker heats differently, so you decide how long you cook your apple sauce for. The original recipe I read said 4 hours for a saucy sauce, but I found that 3 hours gave me some chunky pieces which I prefer.

My apple tree produces a Fuji Apple, but I also added Red Delicious apples to cut down on the sugar addition. Plus, my previous batch of apple butter took a lot more apples than I expected.
For a completely sugar free apple sauce, find out from your produce man what the sweetest apples are for the season!! 

Yield: 3 ~ 16 oz Jars

Prep Time: 45 minutes to an hour (unless you have a rotary apple peeler)

Cook Time: 3-4 hours

INGREDIENTS

A mix of 6 pounds Fuji and Red Delicious apples, peeled, cored and cut into chunks. 
1/4 cup light brown sugar (if needed)
1 teaspoon cinnamon

Directions

1. Combine all ingredients in the Crock Pot and cook on high for 3-4 hours. 
2. For chunky applesauce as pictured, stir and mash the apples with a large spoon close to the end of the cook time.  Store applesauce in the refrigerator for up to two weeks, or freeze in freezer jars for up to 6 months.
Enjoy!! 
xo

Read More

Grilled Rosemary Lamb | December | Cast Iron


 My Artisan Boule bread was baked in an enamel coated cast iron dutch oven, my leg of lamb was warmed/browned in my favorite antique cast iron pan, and my panini sandwhich was pressed and grilled on my cast iron grill and weighted down with a cast iron pan.


Grilled Rosemary Lamb Panini
with Currant Jelly, Spinach and English Cheddar 
on a Fresh Artisan Boule


I hope you enjoy the photo journaling of this recipe.. I enjoyed preparing it just as much as my little family enjoyed eating it!


I used the no knead procedure here. It made a WONDERFUL dough with beautiful air pockets, crunchy crust and a perfectly chewy crumb! The best recipe I have yet used for bread!


Baked in an enameled cast iron pot. So easy and quick!!


Mmmm.. perfect loaf!!


This pretty little piece of pottery is from my daughter Kat, who bought it for me at her college's Art Department Christmas Boutique. She bought it specifically for my photo stylings. :) I love the colors and have decided these shades really do need to appear more in my photo shoots!


I made a rosemary & herb crusted roasted lamb for Christmas dinner. It was SO moist and made the perfect grilled panini sandwiches!


Spread a hearty helping of currant jam on the inside slices of bread, thick slices of English cheddar cheese, good sized portions of lamb slices. Spread butter on outsides of bread. Place on hot cast iron grill and place a heavy cast iron pan or pot on top to weight it down. Turn over to grill on other side. When done add spinach.. Voila!


Be sure to head on over to see what my dear friend Stacey Siegal | Kitchen Serendipity | Longobat Key & Bradenton FL Photographer is cooking and photographing! 
And check out her beautiful recipes and food photos when your there.. this gal can cook!! :)

Till next year.. 
Buon Appetito!! 
Read More

Sunday

Coconut Milk Chocolate Pudding


I can remember it like it was yesterday.. 

Sitting on the floor, huddled up with girlfriends in front of the fireplace on a cold winter's night. 
Home made chocolate pudding.. the one that you made with the recipe from the the Hershey's Cocoa can. I don't think pudding ever tasted so good! For some reason, it's that particular event that is re-played in my mind time and time again when I make pudding for my kids. 

It's been a breezy few days here on the West Coast.. a moderate in temperature Spring day. Comfort and warmth was on the menu! (we like our pudding still a little warm) :)


I have been wanting to try making the pudding dairy free, but i'll be honest with you.. I can't imagine pudding without the luxury of the richness of egg yolks, so as of now.. it's only milk free. I did see some dairy free and vegan recipes out there, and I'm sure I'll try them someday.. but today it's with yokes!


Chocolate Pudding | Made with Coconut Milk
Recipe adapted from Tyler Florence

Ingredients
2 cups whole fat coconut milk
1/2 cup sugar
1/3 cup natural cocoa powder
4 teaspoons cornstarch
3 large egg yolks
2 teaspoons pure vanilla extract
1/4 teaspoon fine salt

Directions
Put 1 1/2 cups of the milk, the sugar, and the cocoa in a nonreactive saucepan. Bring to a simmer, over medium-high heat. Remove from the heat.


Meanwhile, whisk the remaining 1/2 cup of the milk, cornstarch, salt, egg yolks, and vanilla in a bowl. Gradually whisk the hot milk into the egg mixture. Return to the saucepan and cook over medium-high heat whisking constantly, until the pudding comes to a full boil. Reduce the heat to maintain a simmer, and continue whisking until thick, about 2 or 3 minutes more.


While I was taking photos, I asked my Bella if she would go into the garden and choose some flowers to style with the pudding shoot. This was her choice.. perfect!! :) 

Have a favored day!!
Laurie
Read More

Friday

Smokey Spicy Beef Skewers


Mrs G's Hot Pepper Jellies is a product I have mentioned a few times here at DMC. It not only is a product I photograph, but it is a product I use quite often! It makes a beautiful glaze for biscuits,  a sweet and spicy addition for seasoned nuts, and as we've used hear for beef skewers, a wonderful addition to a tangy grilling sauce. But please.. PLEASE don't hesitate to eat it alone by the spoonful!! It's that YUMMY and perfectly balanced with heat on sweet! 

Depending on your own style, you have a few flavor options. I love the JA-HA for it's versatility, I can puree figs, cherries, prunes or apples, and make a chutney style barbecue sauce with it, or use it plain with an addition of crushed garlic and red pepper flakes.. these would be my preferences to accompany beef.  But for a chicken or fish perparation, I prefer the Jalapeño Garlic Lime, Mango Ginger and Peach habanero. (ohh the countless recipes I have yet to create) :)

For this Photo Shoot, I strictly used Mrs G's recipe from her web site. It's DE-LICIOUS! :)
Be sure to check out some of her other amazing flavor pairings and recipes!


Read More

The Inspired Plate | November | A Casual Holiday Breakfast


Welcome to The Inspired Plate. It's the Holidays and we're shooting special foods styled in a holiday setting! I chose breakfast because the aroma of the apples and spices lingering in my house with this granola preparation always puts me in the mood for music, baking and hot tea! I can't believe another year has gone by! Starting January, we'll be celebrating 3 years with The Inspired Plate. So if you're a professional photographer with a niche for food.. definitely email us and let us know! Or visit us at our Facebook Page and leave us a comment!


Casual breakfasts are the key to a stress free day here in our household, especially during the hustle and bustle of the holidays. At least once a week I make a big batch of this granola. This is an adapted recipe that my mom happened to get from one of the cooks at our church's, (Calvary Chapel) Retreat Center here in our local San Bernardino Mountains.


What I love about this granola is the ease of changing the flavor with just a different combination of fruits, nuts and spices. My husband and I like ours with plain greek yogurt and fruit, while the kids prefer there's with milk.. and sometimes as a snack in a baggie for their lunches. This shoot was photographed using a wonderful cranberry sauce, "Crushing Cranberry" that my friend Cheryl made. She made around 200 jars for our church's Christmas Boutique. The best Cranberry Sauce with the essence of orange I've ever had!


Here is the simple granola recipe.. and please don't forget to make your way over to see the rest of the gals' festive food fare! Next up is my dear friend Kim Kelly, San Diego Food Photographer. Her amazing recipes never disappoint!


Laurie's Homemade Granola
Adapted from CC Conference Center Twin Peaks Kitchen
1 Cup Almonds
1 Cup Shredded Coconut
1 tsp. Ground Cinnamon
1/2 tsp. Ground Cloves
1/2 tsp. Fresh Grated Nutmeg
6 Cups Old Fashion Oats (not quick oats)
**Chopped Apples
1 Cup Honey
3/4 Cups Salad Oil

Preheat oven to 350 degrees

In a large bowl, combine almonds, coconut, cinnamon and oats. Mix well.
In a small saucepan, heat honey and oil to simmer, add to the oats mixture
stirring to mix. Divide between two 9x13 or so, baking dish. Bake for 25 minutes stirring constantly so it doesn't burn. Add chopped apples, stir. Bake an additional 10 minutes. When granola is cool, store in sealed containers.


** For this Holiday Granola; I made it with the slivered almonds, chopped apples, cinnamon, cloves and nutmeg. Perfect for our breakfast celebration! But I often substitute *soaked raisins or dried cranberries with a variety of nuts and spices.

* For soaked raisins; Put your raisins in a small bowl and cover with boiling water. Let them steep for 5-10 minutes or over night, and then drain them thoroughly. 


Read More

Wednesday

Creamy Butternut Squash Soup


Creamy Butternut Squash Soup
Gluten Free, Dairy Free 


Ingredients
3 Roasted Butternut Squashes (you can also use pre-cubed squash from the grocery store)
Olive oil, just a few teaspoons
12 oz. unsweetened coconut milk (full fat or low fat)
6 cups low sodium chicken stock
2 Cipollini onions (lightly chopped)
1 fat Garlic clove, mashed with flat side of your knife
2 tsp. freshly grated ginger
Cayenne pepper 
Salt
Cracked black pepper
(For a wintery holiday flavor.. add a 1/4 teaspoon of cloves)
Stand or immersion blender. 

Instructions
Preheat oven to 350 degree’s
Slice butternut squashes lengthwise, drizzle flat side with a teaspoon or so of olive oil, season with salt and pepper. Bake on baking sheet, flat side up, for 40-60 minutes till squash is tender and will easily come off it’s skins.  
Mix Cipollini onion and garlic together, drizzle around a teaspoon of olive oil over it. Roast in the oven on a small tin pan for about 12 minutes, just till onions and garlic starts to get golden. Remove, pat with paper towel and set aside. (important not to have extra oil)
Meanwhile, In a large pot, heat up chicken stock. When stock comes to a boil, turn heat to low. Add coconut milk. Do not let boil. Add freshly grated ginger.
When squash is tender and cool to the touch, remove pulp from skins and add to the chicken coconut stock pot. Also add onion garlic mix. Let come to a soft simmer. (never let coconut milk boil) At this point you will puree your soup. I haven’t purchased an immersion blender yet, so I’m still using my stand blender, BUT.. it’s TIME! :) Puree puree puree.. When fully blended, add back to the pot. Add seasonings, cayenne pepper, freshly cracked black pepper and a little bit of salt, to taste. 
*For those of you who love a little texture, remove chunks of squash from the pot before you puree it. After the soup is pureed, add the soup back to the pot, and add the squash chunks back in and stir.


Read More

Thursday

Peppermint Chocolate Cherry Almond Bark


Who doesn't love chocolate.. and what better, than to make it and give it away as gifts! In 
my home it's a tradition to start our baking when the kids have Thanksgiving break. This week
our youngest was off earlier than usual so here we are, celebrating mom and daughter time and looking forward to the holidays with Peppermint Chocolate Cherry Almond Bark. 


This is the easiest candy to make.. you don't even need a candy thermometer, which I love. Every year when I pull mine out to use, it's either broken or just not calculating the correct temperature. So voila!! No stress about running out to grab a thermometer.. this time! While I have a link to Callebaut chocolates, you can use another good quality chocolate, I think Ghirardelli Chocolates are yummy too. Quite a few years ago I was fortunate enough to find this chocolate in a local candy making store and I fell in love with the taste and texture. Oh my.. it's so buttery and smooth! I hope you enjoy.. Buon Appetito and Happy Holidays!!

Ingredients
1 block good quality dark chocolate (minus a few extra squares)
1 block good quality milk chocolate (minus a few extra squares)
* a few extra squares of chocolate for tempering
1 cup white chocolate nibs or chips
2 tsp. solid coconut oil (you can use vegetable oil also)
1 cup crushed peppermint candies
1 cup chopped almonds
1 cup dried cherries
Offset spatula
Baking sheet covered with parchment paper
Wooden skewer or knife


Directions
1. In a heat proof bowl, add your white chocolate nibs and 1 tsp. of coconut oil. Heat for 1 minute in microwave oven. Stir and heat again for 30 seconds. Stir again and it should be ready.
2. On the stove top in a heavy duty pan, add 1 tsp. of coconut oil and all but a few blocks of the dark and milk chocolate. *The saved chocolate will be used for tempering. Heat on medium low heat so the chocolate melts slowly without it scorching.
3. When chocolate is melted, take it off the heat and add a few of the extra chocolate squares.
Stir till incorporated.
4. On prepared baking sheet, pour your dark/milk chocolate blend onto the paper. With the offset spatula smooth it out across the paper to fill the parchment.
5. With a spoon, drizzle the white chocolate horizontally across the dark chocolate to create lines.
((Pictured below))
6. With your skewer or knife, run up and down through the white and dark chocolates to create the swirl pattern. ((Pictured below))
7. Sprinkle Peppermint candies, dried cherries and chopped almonds on top.
8. Chill in refrigerator till firm. Cut diagonally or in long strips, or for a rough look, break into pieces. Store in an airtight container in refrigerator. 


Quite a few years ago I was fortunate enough to find Callebaut Chocolate in a local candy 
making store, and I fell in love with the taste and texture. 

   Pour the white chocolate horizontally across the dark chocolate to create lines. 
   With your skewer or knife, run up and down through the white and dark chocolates to       create the swirl pattern.


Read More

Wednesday

Two Toned Cocoa and Amaretto Pizzelles


Pizzelles.. they are the quintessential Italian treat that look wonderful plated at an elegant dessert table with it's beautiful floral lace pattern and it's crisp texture. It is a quick an easy cookie to prepare that is the talk of the room at many school parties or family get-together's.

The traditional recipe calls for anise and anise seeds..yes, like my Spungna Di Biscotti Cake.. but also like the Biscotti, it works well with many flavorings. During the holidays I'll give Pizzelle cookies as gift's, side-dipped in a chocolate coating and for more of a festive look sometimes sprinkled with fine glittery candies.

Here I made a two toned pizzelle with cocoa on one side and a dousing of Amaretto in the lighter version. Oh so yummy and flavorful,
and according to my husband, addictive.
Amaretto Pizzelles
(Makes about 2-3 dozen)

3 eggs, room temperature
3/4 cup sugar
1/2 cup unsalted butter, melted and cooled
1 teaspoon vanilla
1 teaspoon amaretto liqueur
1-3/4 cups flour
2 teaspoons baking powder

In a large bowl, beat together the eggs and sugar.
Add the butter, vanilla, and amaretto.
Add the flour and baking powder and mix well.
The batter should be stiff enough to be dropped by spoon.
The batter can also be refrigerated for later use.

Cocoa Pizzelles
(Makes about 30)

2 cups flour
1 teaspoon baking powder
1/2 cup unsweetened cocoa powder
1/2 cup unsalted butter, melted and cooled
1 cup sugar
3 eggs, room temperature
1/2 cup milk
1/2 teaspoon vanilla

Sift the flour, baking powder, and cocoa together in a bowl.
In another bowl, whisk together the butter and sugar.
Add the eggs, milk, and vanilla. Whisk until combined.
Add the flour mixture and blend until smooth.

*Heat the pizzelle baker and follow the directions for How to Make a Pizzelle.
Put half a teaspoon of each, cocoa and amaretto, side by side onto the iron to achieve the two toned affect. It takes practice.. but the result is beautiful and delicious!


Read More

Almond Oatmeal Bars


These oatmeal bars with chocolate chips are amazing and a must try! :)  I have two recipes here, the "allergy friendly" recipe, and the "not so allergy friendly" version. I don't have allergies to nuts, so I bake with almond flour quite often, but this nut free version is still quite satisfying!

Gluten Free Almond Oatmeal Chocolate Chip Bars

3/4 cup oil
1 cup brown sugar
1/2 cup white sugar
1 egg
1/4 cup milk
2 teaspoons vanilla
1 teaspoon baking soda
3/4 teaspoon salt
1/2 teaspoon cinnamon
1/2 teaspoon xanthan gum 
2 cups Almond Flour or Meal
1 cup Quick Oats (GF)
1 cup Gluten Free Baking Mix (Arrowhead Mills)
2 cups chocolate chips (semi-sweet or milk)


Preheat oven to 350 degrees Fahrenheit and spray a 9X13 cake pan with cooking spray.  Combine oil, sugars, egg, milk and vanilla in a mixing bowl and mix on medium for 1 minute.  Add the dry ingredients except for the chocolate chips and mix until just combined.  Stir in the chocolate chips and spoon dough into the prepared pan spreading to the edges.  Bake at 350 degrees for 20-25 minutes.  Cool slightly before cutting into bars.

~~~~~~~~~~~~~~~~~~~~

Gluten Free, Nut Free Oatmeal Chocolate Chip Bars

3/4 cup oil
1 cup brown sugar
1/2 cup white sugar
1 egg or (egg substitute)
1/4 cup coconut milk
2 teaspoons vanilla
1 teaspoon baking soda
3/4 teaspoon salt
1/2 teaspoon cinnamon
1/2 teaspoon xanthan gum 
2-1/2 cups Gluten Free Baking Mix (Arrowhead Mills)
1-1/2 cups Quick Oats (GF)
2 cups chocolate chips (semi-sweet)


Preheat oven to 350 degrees and spray a 9x13 cake pan with cooking spray.  Combine oil, sugars, egg, coconut milk and vanilla in a mixing bowl and mix on medium for 1 minute.  Add the dry ingredients except for the chocolate chips and mix until just combined.  Stir in the chocolate chips and spoon dough into the prepared pan spreading to the edges.  Bake at 350 degrees for 20-25 minutes.  Cool slightly before cutting into bars.


Read More

Monday

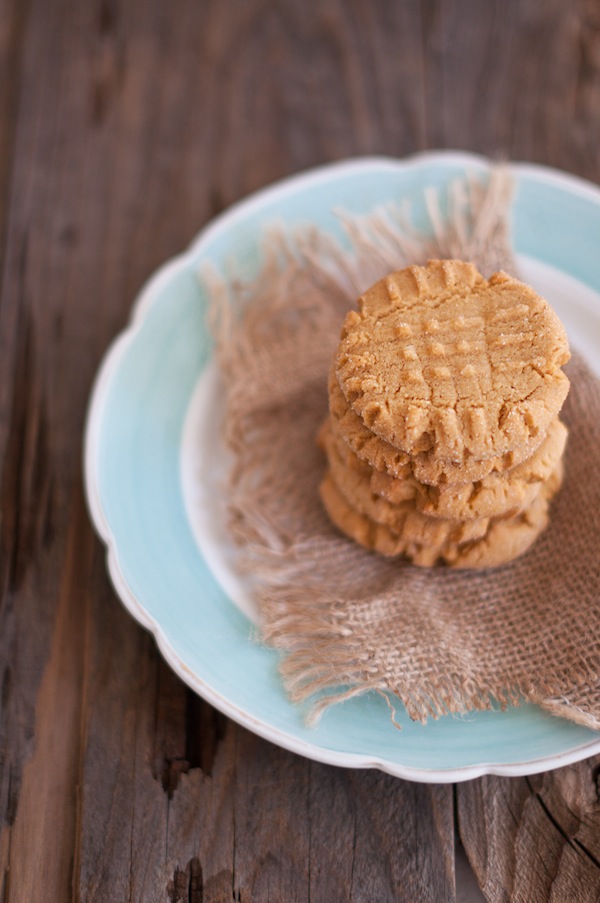
Peanut Butter Cookies


Gluten Free Peanut Butter Cookies
Adapted from the Better Homes and Gardens Cookbook

Yield: about 36 cookies
Bake 375°F  7-9 mins per batch

Ingredients
½ cup butter, softened
½ cup peanut butter
½ cup granulated sugar
½ cup packed brown sugar or 1/4 cup honey
½ teaspoon baking soda
½ teaspoon baking powder
1 egg
½ teaspoon vanilla
1-¼ cups Gluten Free Baking mix with added Xanthan Gum 
(or GF Flour blend plus ¼ rounded tsp. of Xanthan gum.)

Granulated sugar for rolling dough balls

Directions
In a large mixing bowl beat butter and peanut butter with an electric mixer on medium to high speed for 30 seconds. Add the granulated sugar, brown sugar, baking soda, and baking powder. Beat until combined, scraping sides of bowl occasionally. Beat in the egg and vanilla until combined. Beat in as much of the flour as you can with the mixer. Stir in any remaining flour. If necessary, cover and chill dough about 1 hour or until easy to handle.

Preheat oven to 375 degrees F. 
Shape dough into 1-inch balls. Roll balls in additional granulated sugar to coat. Place balls 2 inches apart on an un-greased cookie sheet. Using the tines of a fork, flatten balls by making crisscross marks on top. Bake for 7 to 9 minutes or until bottoms are light brown. Transfer to a wire rack and let cool. 


Makes about 36 cookies.


Read More

Friday

Colored Sugar Shapes


This isn't my first post about sugar shapes, in 2008 I also wrote about these wonderful sugar creations that are SO easy and quick to make. I actually have to give the credit for this batch to my 8 year old daughter who was so excited about playing in the color stained water and filling the candy molds. I was happy to have her help.. because at this point I was more interested in clicking away with my camera and getting some pretty photo's.

I wasn't just shooting for Dalla Mia Cucina this time around, Simone from Jungle Frog Cooking is a professional Food Photographer who periodically has food photo challenges on her blog. I thought it would be fun to join in THIS particular one, themed on the use of "white". My experience with shooting all white has usually left me with burned and over exposed images. Even this time around, the light in my studio wasn't "all that", and I had the wrong bulbs in my lamp stands (which cast a yellow light) so I went "tout naturel" and upped my exposure trying to eliminate the shadows. Oh how I HATE shadows! :)

I usually use my 24 -70 mm lens f2.8, but I knew I was going to need as much light as possible filtering in, so I used my 50mm f1.4 lens. Other than having a smaller cropping area to play with, it was a pretty good choice. Hope you enjoy the photo's.. and the Sugar Shapes!! 


Colored Sugar Shapes

This is an easy and elegant way to serve sugar at your holiday or everyday table. My children and I started making these a few years ago and now regularly enjoy these shaped and colorful cubes for our coffee and tea. With holiday dinners and family gatherings just around the corner definitely make time for this easy preparation.


Ingredients
Sugar
Food Coloring *
Water
Candy or Chocolate Molds


 Instructions
Color your water to desired shades.
Add 2 teaspoons of water to 1 cup of sugar, combine until it's the consistency of wet sand.
Pack moistened sugar into plastic mold trays (with shapes 1 to 1 1/2 inches wide available at Joanns Fabrics & Crafts or kitchen-supply stores).
Scrape level with a spatula. Let harden.
Turn plastic molds over gently on cookie sheet, they should release easily.
Store in an airtight container in a cool, dry place.


* My son came up with an alternative to colored water. He places colored sugar crystals (sold in craft stores) on the bottom of the plastic molds before he adds un-colored sugar. This also lends to a very beautiful display!

Enjoy and Buon Appetito!
Laurie
Read More

The Inspired Plate | March Challenge | Breakfast


This month The Inspired Plate is celebrating our monthly challenge with "Breakfast".
I know this looks like a simple breakfast.. with not too many ingredients, but I so often eat alone
in the mornings after the kids have all gone to school and this for me is quick and satisfying. A soft cooked egg, thinly sliced and buttered sourdough toast.. perfect for dipping, and a cup of tea. 

A few of the gals added a challenge element to their photos, Morning Sunlight. The top photo was shot early in the day with my place setting in front of the light source. Creating a "Backlit" effect. I love the warm glow it gives and you can almost see a faint outline of the trees in my backyard.


I had so much fun shopping for props this month. Spring is definitely in the air and all the beautiful hues of yellow, pink and lavender set the tone for this place setting beautifully. I LOVE this tea cup and saucer. And this egg cup.. so adorable! Right before Easter isn't really the best time to be looking for egg cups. I scoured the antique market and probably spent 3 hours perusing the aisles to find one that would match this lovely tea set. But, I have an idea that many hostesses thinking of serving soft cooked eggs on Easter.. and throughout Spring, was a very good idea!


My garden is in bloom with a variety of lavender plants and daisies. I just love this pop of color streaming through my kitchen and family room windows!


Soft Boiled Eggs are easy to cook. Take out your eggs ahead of time and allow them to come to room temperature. This will prevent them from cracking when you put them into the water. Boil water in a small saucepan. Make sure you have at least 3/4 of the pan filled. Bring to a rolling boil. Lower temperature to medium high, carefully place eggs in water. Allow them to come back to a soft boil. (not simmer) Cook exactly for 4 minutes for firm whites and a soft yolk. Season with salt and pepper and enjoy with your favorite toast! I drizzle my sourdough toast with honey. yum. I love the salty savory taste with the sweetness of a little honey! :)

Please be sure to head on over to Stacey Siegal | Bradenton FL Food Photographer. I am sure she will have some beautiful and scrumptious photos and recipes to share! My lucky friend sits pretty on the warm beaches of Bradenton and rocks her camera! She is SO talented and it is a privilege having her join us for a second year!

Ciao and Buon Appetito!
Laurie


Read More

Thursday

Masala Chai Tea


We have this wonderful little spice shop in Temecula called "The Old Town Spice Merchant". With the smell of spice in the air it feels festive all year long. I Love it!


You will LOVE making your own chai tea! I suggest even if you don't intend to make it soon, keep these spices on hand! They are wonderful additions to stews, cottage pies and savory pastries!
If you are dairy free.. you will love the coconut milk version, it's so Island Perfect! Also the almond milk version, amazing aroma and flavor!

Masala Chai Ingredients

9 whole cloves

4 cardamom pods

4 star anise
1 cup water

2 cups milk
 of choice (cow, coconut, almond, rice...)
1/2 teaspoon ground ginger

5 pepper berries
2 rounded tablespoons raw sugar

2 heaping tablespoons Cinnamon Orange Black Tea (or black tea of your choice)


Masala Chai Directions
In a mortar (or a mini prep grinder), crush the cloves, cardamom pods, star anise and  blackpepper berries. 


Transfer the crushed spices to a small saucepan, add the water and ginger and bring to a boil. Turn heat to low and let simmer for 8 minutes.


This gorgeous loose tea is a black tea with crushed cinnamon stick and dried orange peel.


      After spices have simmered for around 8 minutes, add the milk, loose tea and sugar.


At a low temperature, let the Masala chai simmer for 5-7 more minutes.


      When it starts to get frothy turn off the heat and and let it sit for 5 minutes. Strain 2 times
      through a sieve into a teapot.


As you can see from my messy stove top, I double refined this chai tea through two strainers. It wouldn't even be a bad idea to run it through a cheese cloth if you have that on hand. Enjoy your chai tea.. definitely with someone who's company you enjoy! It's so fun to make this from scratch, and so worth the taste !


Read More