I have joined the Kefir craze! :)
I am around 6 months new to making Kefir, and I have already experienced tremendous benefits from this tangy milk drink. I honestly have SO much more energy, and the uncomfortable full feeling I have acquired in my “old” age has disappeared, an all over good feeling in my tummy! I must say, I have done a total 180 when it comes to what I eat. I have also become Gluten Free, but rest assured, I will continue to post dishes and recipes with wheat, as well as GF. My family still enjoys their pasta!! :)
Kefir is an easily digested, “probiotic” cultured dairy drink, in fact, it’s the BEST source of probiotics you can find! The origins of it come from the Caucasus Mountains of Eastern Europe, and were discovered over a thousand years ago by nomadic shepherds.
It tastes similar to a thin yogurt, tangy with a bit of an effervescence due to the fermentation process. It has a sweet milk smell, with an essence of yeast. The fermentation process is brought on by adding “Kefir grains” to milk. The debate on this is quite interesting, during my research, I noticed many people cultivate their grains in non dairy liquids. For the “milk” kefir, according to the National Kefir Association, Kefir cannot be made out of non dairy bases such as water, fruit juices, teas, and coconut water. There is no such accepted definition as “dairy-free Kefir.” From what I have read, dairy free Kefir loses some of it’s benefits such as intestinal cleansing and the boosting of your immune system. Not to say that you can not "enjoy" water kefir.. it is a lower fat drink and still gives benefit.
Benefits of Kefir; High in vitamins and minerals. Kefir makes up a whole protein and it is the best sourced probiotic.. and the least expensive if you make it on your own! It’s high in the B’s and K2. It also helps your body absorb these essential vitamins that are not so easily absorbed. Because of the immune boost, it encourages an all over “good feeling” on the body and has been said to calm ADD symptoms and promotes better digestion, which in turn may help to lose weight. It is wonderful for those who are lactose intolerant. Something about the fermenting process makes the lactose tolerable. You have to try it to believe it! :)
I am going to do my best to show you, through photo’s the Kefir making process,
and a Blueberry Banana Kefir Smoothy recipe to boot!
These are Kefir grains. They look like milky cauliflower florets. Kefir grains can be purchased on-line, but it's best to get them fresh from a friend. Once you have the grains and make kefir daily, your grains start to grow. You can divide them and share with friends, or you can divide them into new jars of your own and mass produce! You will have kefir milk galore!
Here in my community, I received mine from a girlfriend from church, and she received hers from a friend from church.. and so on and so on. I recently gave my mom her first kefir grains and now hers are growing and she will soon be able to give some to her daughters (my sisters) :) and her friends.
These are spick'n span clean mason jars. Mine are 3 cup capacity jars. I keep 2-3 on hand.
2 Tablespoons kefir grains in jars.
Add 2 cups milk to the grain in your jars.
Raw milk is best, but you can use regular also. (goat milk works too!) I use low fat milk, or reduced fat, but I know some gals use fat free.. it is still dairy milk so it works fine!
With a plastic or stainless steel spoon, gently stir.
Cover the kefir with a paper towel or cheesecloth. The KEFIR NEEDS TO BREATHE, so DO NOT cover it with a lid! If you do not have the mason jar seals, you can use a plastic rubber band to keep your cloth in place.

Place your jar in a pantry for 18 -24 hours. The milk will "NOT spoil"!! This is the fermentation process that creates all those good bacteria and vitamins, minerals, enzymes and probiotics. The longer you keep your grains in the pantry, the more sour tasting and the thicker the kefir will become, which some people like. :) During the summer months you will find your kefir fermenting faster, 18 hours will probably be suffice. During winter I can leave mine in the pantry for 20-24 hours and have the perfect kefir consistency.
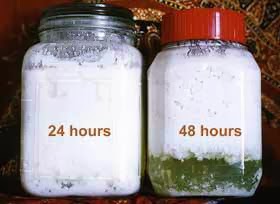
When kefir is ready it will start to look curdled. You will probably see your "curds and whey" separating. Perfect! My above picture shows the kefir milk still in an early stage.
 |
| photo coutesy Jane from Here's To Life |
The above picture depicts what you will likely have at these time intervals.
Stir your kefir gently to bring it back together if you'd like, then begin the straining process.
There are some debates on your straining utensils.. In the olden days before metals were stain and rust proof, you were advised to use plastic spoons and strainers. Some people still do.. but it isn't necessary. Stainless steel is non reactive.
In addition* "It is strictly unsafe to use either brass, aluminium including copper, sliver, zinc, and iron containers for either culturing kefir, or, for storing kefir grains or liquid-kefir intended for consumption! Neither is it safe to use strainers that are made from any of those "reactive" metals to strain kefir!"
This information comes from "Dom's Kefir Making site".
So now that we have that out of the way, you will need;
Strainer, funnel, milk container with lid, bowl and spatula.
Strain your kefir milk and grains into a bowl. With a spatula, gently so you don't 'smash' your grains, move the liquid and grains around till all you have left in the strainer is those beautiful grains you started with. Don't be afraid.. shake it up a little and hit the sides of your colander to get all the thick goodness through the strainer!
By the time you have strained your grains from the milk, they should look like this again..
and you will be left with this beautiful container of kefir.. ready to use! Refrigerate the kefir. It will stay fresh for a week in your refrigerator. But use it daily to get the physical benefits!
At this point you will start your process all over again!
Now for a yummy kefir smoothie recipe!
Blueberry Banana Smoothie
(serves 4 in medium sized glasses)
3 Cups cold kefir
2 Bananas
1 - 2 cups fresh cleaned and dried blueberries (frozen works too)
1/2 tsp. NuStevia if needed or a few teaspoons Honey
Mix in blender.. Enjoy!!!


